You will need the following equipment –
1. 700mm rule
2. Buckets or wheelbarrow
3. Cloth
4. Flow/Spreading table
5. Hardwood tamping bar
6. Mixing tray
7. Flow mould
8. Sampling scoop
9. Sampling and testing certs
10. Small scoop
11. Square mouthed shovel
First find a suitable location for the flow table it must be placed on a firm flat surface
It may be necessary to prepare an area for the table.
Step 1
· Empty the sampling buckets on to the mixing tray
· Scrape each bucket clean
Step 2
· Thoroughly remix the sample shovelling into a heap
· Turn the heap over to form another
· Do this three times
Step 3
· Flatten the final heap by repeatedly digging in the shovel vertically
· Lift the shovel clear each time
· If the alternative method of sampling has been used, divide this heap into two and test each part
Step 4
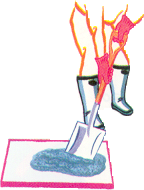
· Ensure the mould and table are clean and damp
· Place the mould on the centre of the table and stand on the foot pieces
· Fill the mould in two layers, tamping each layer ten times with the tamping bar
· Use the tamping bar to strike the concrete level with the top of the mould

Step 5
· Carefully clean off spillage from around the mould and table top
Step 6
· Carefully lift the mould straight up and clear to a count of between
3 and 6 seconds
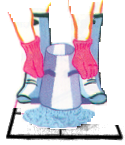
Step 7
· Carefully stand on the toe board at the front of the table
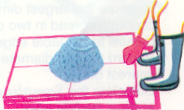
Step 8
· Slowly lift the table top by the handle until it reaches the upper stop
· Allow the table to fall freely
· Repeat this cycle to give a total of 15 drops
· Each cycle should take about 4 seconds
Step 9
· Measure the largest dimension of the concrete spread in two directions parallel to the table edges
· Record the two diameters to the nearest 5mm
· Complete the sampling and testing certificates