Concrete cube testing is a critical procedure in quality control for construction materials. It ensures that concrete used on-site meets the desired compressive strength standards. This testing method provides reliable data to evaluate whether a specific concrete mix is structurally sound and fit for purpose. At CAPCO, we specialise in providing high-quality test moulds, tamping bars, and other essential tools to support accurate and consistent concrete cube testing in line with British and international standards.
Why Concrete Cube Testing is Essential
The strength and durability of concrete are key factors in the integrity of any structure. Concrete cube testing helps verify the strength of hardened concrete by crushing cubes made from the fresh concrete mix. This test, often performed at 7, 14, and 28 days, is essential for:
-
Ensuring compliance with building codes and structural specifications.
-
Identifying potential weaknesses in a batch or mix design.
-
Providing documented proof of concrete performance for project certification.
Standards and Best Practices
To maintain consistency and accuracy, it’s vital to follow the BS EN 12390-2 standard. This sets guidelines on making, curing, and testing concrete specimens. Adhering to these practices increases the reliability of your test data and ensures industry compliance.
In addition to British standards, many professionals also consult international references like ASTM C31 for insights into global best practices. Incorporating multiple sources of industry guidance demonstrates a commitment to high-quality assurance protocols.
Comprehensive Guide to Concrete Cube Testing | Learn How to Make Test Cubes
|
You will need the following equipment – 1. Brush and mould oilBreitling Replica watches 2. Buckets or wheelbarrowreplica panerai watches 3. Cloth Omega replica 4. Cube mouldsfake Panerai 5. Damp cloth and plastic sheet 6. Rubber Mallet 7. Mixing tray 8. Pen 9. Sampling scoop 10. Sampling/cube/storage certificates 11. Small scoop 12. Spanner 13. Square mouthed shovel 14. Steel float 15. Compacting bar Lightly re-oil cube moulds with release oil |
Step 1
· Check that the Moulds are clean and lightly oiled with bolts tightened
· Ensure that the correct halves of the mould are used and that the corner pins are correctly located

Step 2
· Thoroughly remix the sample shovelling into a heap
· Turn the heap over to form another
· Do this three times
· Flatten the final heap by repeatedly digging in the shovel vertically
· Lift the shovel clear each time
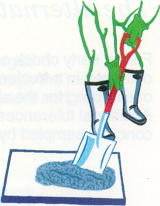
Step 3
· Fill the Mould with concrete in 50mm layers
· Using the special Compacting Bar, compact the concrete with no less than
25 tamps for each of the two layers in a 100mm Mould
35 tamps for each of the three layers in a 150mm Mould
For very high workability concrete you may not need the minimum number of tamps
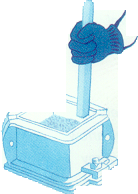
Step 4
· Remove surplus concrete and smooth over with a float
· Wipe clean the Mould edges
· Number the Moulds for identification
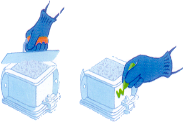
Step 5
· Cover each Mould with a damp cloth and plastic sheet
· Store inside at normal room temperature (15 – 25oC)
· Protect the Cube Moulds at all times from high and low
temperatures (especially frost) and drying winds
· Complete the sampling and cube making certificates